|
MacInvoice
Setup ...
|
|
The
first screen you will see when starting MacInvoice for the first
time is the License Agreement. This screen will remain in
place for 10 seconds, after which you may either Visit Praevius.com,
Accept the terms of the license, or Reject them. |
|
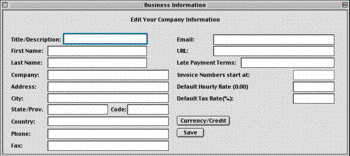
Once you
have accepted the License Agreement, you will see the Business
Information screen.
Here you
will fill out information about your business, location, what
number to start the invoices at, what your default hourly rate
is, as well as the default tax rate in the state where you operate
your business.
This screen
will require you to fill all boxes. However, if you need to fill
out a specific tax rate for different invoices, simply make the
default tax rate 0. You can then manually input the tax rate for
every item.
*New*
To setup
you default currency and accepted methods of credit, click on
the Currency/Credit button. (See below)
|
|
|
|
*New*
The Currency
screen allows you to enter the default currency for your country.
First, type in the name by which the currency is referred to,
then the symbol that it is represented by. Click add, then double-click
the currency to set it as the default billing currency.
If you have
International clients, requiring you to invoice in multiple currencies,
you can enter additional currencies that can be selected on the
Main Invoice screen.
NOTE: Once
you use a currency in the creation of invoices, do not remove
that currency, or change its name. Otherwise, MacInvoice will
not be able to reference to it, and it may cause continuity issues.
Also, do not remove the file in your MacInvoice folder called
"InvoiceCurrencies.rdb", even if you don't use other
currencies.
|
|
*New*
Similar to
the Currency screen, the Credit screen allows you
to create a list of credit cards that your company accepts. This
list will appear at the bottom of your invoices.
|
|
 |
The second
screen you will see is the Add Employees screen. Here,
if you choose, you can enter the names of your employees. When
creating invoices, you can then select the salesperson responsible
for the transaction.
If you do
not wish to track employees, press the Next button to skip
this process. If you decide not to track employees, you will not
be prompted to enter an employee name when creating a new invoice.
You can however, add employees in the future via the Tools Menu.
|
|
The third
screen is the Enter New Customer screen. Here you will
add the pertinent information about each of your customers including,
company name, first and last name of the billing contact, billing
address, primary and secondary phone numbers, default tax rates
for each customer, customer specific billing terms, as well as
the e-mail address where you can send electronic bills, in the
event that the customer prefers to be billed electronically.
You must
add at least one customer at this time, filling out all fields
with the exception of secondary phone and e-mail
If you do
not wish to set up all of your customers at this time, you can
set up additional customers at a later date via the Tools Menu.
|
|
|
|
The Inventory
Editor actually serves two functions. It both maintains your
Autofill entries, as well as tracks inventory.
Simply enter
a unique Item ID, Item Name, Comment (which will
appear in the Comment field on the invoice), Your Cost
on the item or service, Unit of measure, Price Per
unit, and the number of In Stock (if you are a service
based business with no physical inventory, simply type "NA"
in this field).
You can either
add your Inventory/Autofill items now, or "on-the-fly"
from the Main Invoice screen, as you create your invoices.
|
|
The fourth
screen is the E-mail Billing Settings. Here is where you
will fill in your SMTP (sending mail) server, your e-mail address,
the subject line you want electronic bills to display, as well
as opening salutations and closing comments that will be displayed
on each electronic bill.
These setting
are optional. If you choose not to set up MacInvoice for electronic
billing at this time, you can always set it up later via the Preferences
Menu. You may need to contact your ISP or network administrator
for these settings.
|
|
|
|
*New*
MacInvoice
now allows you to set a password, requiring you to login at startup.
To enable this option, go to Edit > Preferences > Set Startup
Password.
NOTE: If
you forget your password, you will need to contact Praevius, Inc.
Customer Support to unlock MacInvoice.
|
|